Quick Start Guide to Streaming on Twitch using OBS Studios
With only a few pieces of hardware and free software, you can start streaming video games on Twitch with Twitch Studio. Try this simple setup.
With video game streaming becoming a massive content creation outlet in the past few years, more and more people want to stream on the side, hoping to one day become full-time, sponsored streamers.
The rise to the top has many paths, but you have to start somewhere. Top streamers are celebrities in their own right, complete with high-end streaming setups that would make the average wallet cry. But you don’t need an RTX 2080 Ti graphics card or a 4K curved monitor to stream. To start, all you need are a few pieces of hardware, some video games — although not all streamers play games — and an on-camera personality that’ll resonate with an audience.
While I can’t help much with the personality aspect, I can say there’s an audience out there for everybody, so don’t try too hard to appeal to the masses. Just do you, and other like-minded people will hop on your chat with subs and donations in no time.

What is Twitch and what will I need to start streaming on it?
You don’t need much to get started, and there’s a good chance you may already have some of the equipment needed to stream. The image above is something to aspire to, but not all the items are necessary to start with. Here are the basics to get you started:
- Computer
- Camera/Webcam
- Microphone
- Dual Monitors
Yeah, that’s not much, but the computer itself will take up most of the budget. If you already have a capable computer, that’s a good chunk of money you won’t have to spend, and microphones and webcams can be found for around €100 each. The second monitor won’t necessarily improve the quality of your stream. Still, having a second monitor will make it easier to manage your stream, make layout transitions, and, most importantly, keep up and interact with viewers on the chat.
Here are some minimum recommendations from Twitch on any additional equipment you might need.
PC computer
- Intel Core i5-4670 or AMD equivalent central processor
- a graphics card that supports DirectX 10
- 8 gigabytes of RAM memory
- Windows 7 Home Premium operating system
Mac computer
- 2.3 gigahertz Intel Core i5 central processor
- 4 gigabytes of RAM memory
- AMD Radeon or another dedicated video card
Steps from Twitch Creator Camp
1. First, if you don’t have one already, you’ll need to create a Twitch account. Don’t forget to turn on Two-Factor Authentication to keep your account safe. We also recommend downloading the Twitch app on your iOS or Android mobile device. Not only can you use it to watch streams wherever you are, but you can also access your Creator Dashboard to modify basic settings, run ads, and even go live.
2. Review the Community Guidelines and Terms of Service fully. It’s also recommended that you establish your Moderation and Safety settings before your first stream to ensure the best experience for you and your growing community. AutoMod is a great tool to serve as your first line of defense for moderation, with settings you can adjust to your preferences.
3. Customize your channel so new viewers know who you are when they find you. You can modify your profile photo and bio via your mobile device, or customize a number of additional settings via a web browser. We’ve set up an entire Creator Camp page on Personal Branding to show you all of the places you can customize your channel page to reflect you and your brand.
4. Optimize your setup! You’ll want to consider which hardware you’ll need to stream your audio and visuals. Keep in mind, it doesn’t have to be complicated!
5. Select and set up your broadcasting software so you can get your content out there! Twitch Studio, available on both Windows and Mac, is Twitch’s first-party streaming software that makes it easy to set up a stream and go live in minutes. Guided onboarding helps automatically detect your microphone, webcam, and other technical aspects of a stream, and pre-loaded starter layouts help creators effortlessly personalize the look of their stream. Alerts and Chat are built-in, helping you easily monitor channel activity and interact with your community. You can also use Streamlabs or OBS Studio (I’m currently using this one).
6. Add a few extensions to your channel. Visit your Creator Dashboard and navigate to the Extensions tab right above the Creator Camp link. As an example try out the CTRL+ and Sound Alerts extensions to enhance your community viewing experience and drive viewer participation.
Setting up Stream to Twitch on a PC using OBS Studios
You need to install a piece of broadcast software. A popular choice for streaming with Twitch is OBS, or Open Broadcasting Software because it’s completely free. Instructions for installing it – and links to installation packages – on various operating systems can be found here.
The next thing you will need to do is tell your broadcast software where you want to stream – in this case, Twitch. To do this, you will need your “stream key” from Twitch, which identifies you to broadcast software as a unique user on Twitch. To get it, go to Twitch in your web browser and log into your account. Then, from your main dashboard, click the Stream Key tab, and then click Show Key. Write this code down, or copy it to your computer clipboard.
Next, go back to your broadcast program. In OBS (for the purposes of this example), go to the Settings menu and then select the Stream sub-menu. Under “Streaming Services,” select Twitch, and then under “Stream Key,” type in or paste the code that Twitch gave you.

NOTE: Some broadcast software will allow you to log directly into your Twitch account, which will usually allow you to bypass this step.
Set the graphics quality for your stream
Now you will have to set your stream’s “resolution,” or how crisp the graphics will be. To do this in OBS (again, for the purposes of our example), select the Video sub-menu from the “Settings” menu. Here, you will be able to set the “Base” and “Output” graphics quality of your stream.
The “Base” setting will affect how the stream looks from your end. Usually, it will be set to the default resolution of your computer monitor – which is where you want it to be – so you can ignore it. The “Output” setting, meanwhile, affects how your stream will look to viewers. A starting baseline is 1280 by 720 pixels (a.k.a. 720p, progressive scan) and 30 FPS (frames per second).
Choose the speed of your stream
Next, you will have to tell your broadcast software your “bit rate,” or how fast your Internet connection will be processing the graphics in your stream. Better graphics need higher bit rates to display them properly, but if your Internet connection can’t handle the load, you could actually experience slowdowns or disruptions in your stream. That might mean it’s time to switch to a lower resolution and/or bit rate so that your stream plays more smoothly.
Anyway, to adjust this setting in OBS (for our example), select the Output sub-menu of the “Settings” menu. Then, under “Streaming,” select a bit rate. OBS’s recommendation to go along with the resolution benchmark it recommends (which I mentioned in the last step) is 2500 kbps (kilobytes per second).
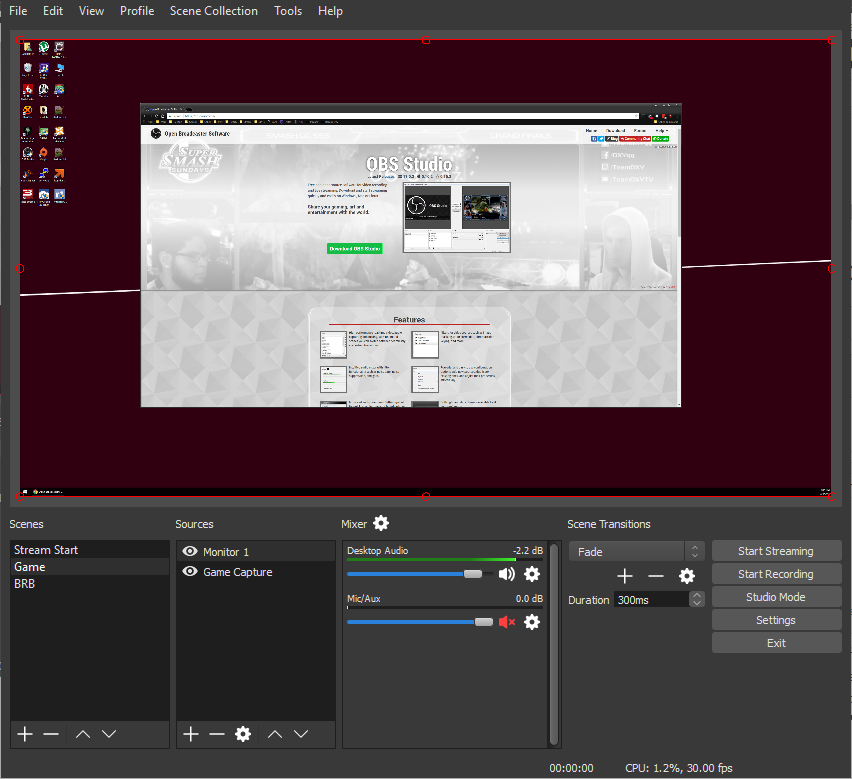
Set up your stream presentation
Next, you will have to decide what is going to be displayed on-screen during your stream, where, and when. Some broadcast programs have templates for popular games that you can use. Others may allow (or require) you to manually set up each scene in your stream, where the source material for each scene (e.g. a static picture, your game feed, your webcam, etc.) is coming from, and when each source is visible or not. Refer to the instructions for your particular broadcasting program for more information.
Start your game
Once you have all of that configured how you want it, simply boot up the game you want to play, click Start Streaming, and you’re off to the races!
For a better guide on how to stream using OBS Studios, you can use this link: https://obsproject.com/wiki/OBS-Studio-Overview